

In this article, I will walk you through the steps to create a prototype of an R project with pipeline integration, package management, and version control. If you follow these four simple steps, you will be well prepared to tackle any (data-driven) question that comes your way.
With version control and package management, we make sure our project is well-documented and understandable to others. It is also great for reproducibility, in case we want to use parts of it in other projects later, or want to understand in the future what we did in the past.
Pipeline integration also helps with project documentation by clearly linking inputs and outputs and keeping everything up to date. It also adds scalability, both in terms of handling larger projects by breaking them into subcomponents (without losing track of each step), and in terms of performance improvements.
So, let’s get started.
Steps
- Create the project folder structure
In this first step, we will set up all the potential folders needed for our project. A sample structure looks like this:
project-folder/
|-- data/
    |-- raw/            # original data
    |-- processed/      # data processed by your code
|-- code/               # code files and functions that will be connected through the _targets.R file
|-- output/             # generated output files
    |-- estimations/
    |-- graphs/
    |-- maps/
|-- documentation/      # documentation files that help with understanding the project
|-- README.md           # general infos about the project
|-- .gitignore          # Files/ folder to ignore in version control
|-- _targets.R          # main file of targets pipeline
You start with your main project folder and add folders for data, code files, and generated output. These subfolders ideally contain subfolders of their own, providing an organized structure for various inputs and outputs.
- Initialize a Git repository
With all the folders in place, it’s time to add version control to the project. I use Git and GitHub (for remote version control) because they are both widely used and fairly easy to use. There are other version control systems available, such as GitLab, with typically similar structures and functionality.
The method described here starts with a local repository and adds the connection to a remote repository later. You could also do it the other way around, starting with a remote repository and cloning it (git clone URL) to your local folder.
After installing Git (there’s a detailed description on the website — it’s pretty standard), you initialize an empty repository by typing git init in the Git Bash (I’m using Windows). From this point on, version control is active, and changes are tracked.
Since not all files and folders should be monitored — some may contain sensitive information like config files, or have complex structures like data files — it is good practice to exclude them. So we add a .gitignore file to our main project folder. Open your favorite text editor (I use VS Code) and add all the files and folders you want to be removed from version control, such as the data folder. After committing the changes to gitignore, any changes to those listed files will be ignored.
Tipp: If you are on Windows, it may happen that Windows does not allow you to save files properly without a file extension. Try saving the file as “.gitignore”. The second dot will be removed automatically.
- Initialize package management
The third step focuses on package management in R. Similar to code files, we want to monitor the libraries we use. This is especially important if you are working with highly specialized libraries and functions that may stop working as developers implement new features or fix bugs.
Fortunately, R provides a built-in tool to help us do this, called renv. renv can be used as a package management system within R. It handles dependencies between libraries and also ensures reproducibility by storing information about the libraries installed and imported, and the version we are using.

The idea is very similar to Git’s version control of code files. A snapshot of the library version is stored in a lock file. If needed, this lock file can be used to revert our libraries to a previous version. The workflow is also very similar to Git: You initialize renv with renv::init(). Then you install the packages with renv::install() (the usual install.packages() also works). Finally, take a snapshot with renv::snapshot(). Now everything is stored in the lock file.
- Setting up the data pipeline
For the data pipeline, I rely on the targets library in R. It monitors the dependencies between input files and outputs. It also makes sure everything is up to date. Most importantly, it skips steps that are not affected by newly implemented features. This helps the performance of your project by saving processing power. targets also allows for parallel processing, which improves performance even more.
You initialize the pipeline with targets::use_targets(), which generates the pipeline’s main file _targets.R. From this main file, you can implement the building blocks of your project, such as preparing files, generating descriptive statistics, running models, and so on. There are specialized functions within the targets library for different tasks. I recommend checking out the documentation. It’s definitely worth it.
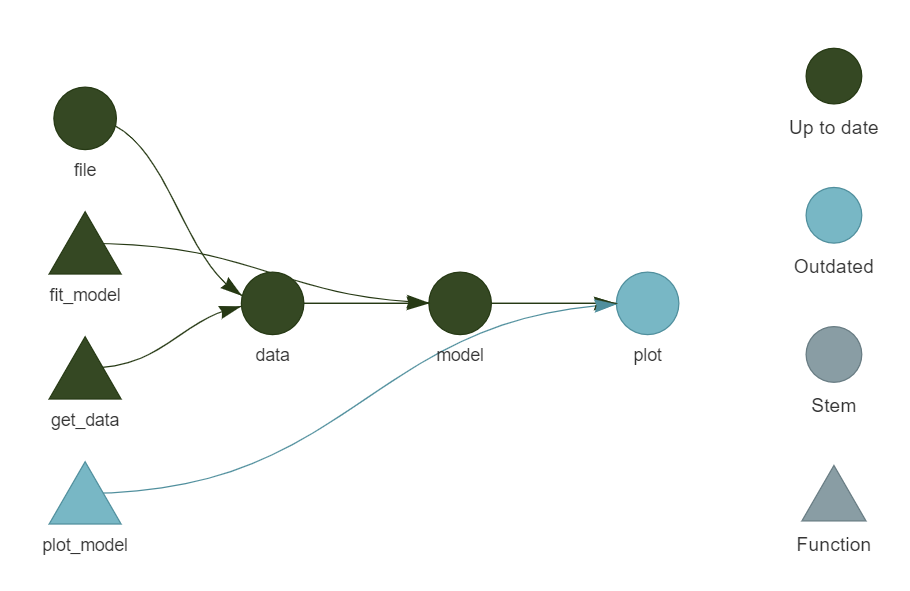
Below is an example of a standard pipeline. As you can see, it identifies the dependencies between files, functions, and outputs. It also highlights steps that are current and steps that are outdated and will be updated the next time the pipeline is run.
These four simple steps will get you started on your project. A clear folder structure makes sure everything is organized and nothing gets lost. Version control and package management help you document your steps and ensure reproducibility. And the data pipeline clearly connects inputs and outputs while improving your project’s scalability and performance.
Thank you for reading!
Check out my GitHub for other projects. You can also read the story on Medium. Feel free to reach out on LinkedIn.
Suggestions or questions? Leave a comment or contact me.
Leave a Reply